Shantha Kumar T
Programmatically access Office 365 User Licenses using Microsoft Graph
Here, you can learn how to access the user licenses from the Office 365 tenant using Microsoft Graph API with an simple client side application.
Microsoft Graph opens the extensive approach for developers to connect various services across Microsoft Cloud. A Single endpoint requests the Microsoft Cloud with the various resources enables the possibility with connecting them.
Microsoft Graph requests the endpoint with the resources with properties enables to get the required values for the requested users.
By default, Microsoft Graph’s user resource doesn’t provide the direct way to get the license information for the user.
But, Office 365 Admin Center has a below post request endpoint to retrieve the users and their licence information.
POST https://admin.microsoft.com/admin/api/Users/ListUsers
We do not have access to the above endpoint to use it in a custom application. Instead of the admin api, we can use Microsoft Graph as an alternative to retrieve the Users and Subscription information.
After researching the Microsoft Graph’s Users resource of v1.0 version, doesn’t have the license information with the user data. But beta version of Users resource has the property assignedLicenses with an array of Subscription Ids .
GET https://graph.microsoft.com/beta/users

In future, it may get added to the public version under the Users resource.
The above endpoint returns only id of the Subscribed licenses, to get the name of each subscription id, we have an another resource called “SubscribedSkus”. This endpoint returns the available subscriptions with a name, Id with other properties of each subscription.
Get https://graph.microsoft.com/v1.0/subscribedSkus
These two endpoints return the values separately. So, we will create a client application to merge the above two endpoint requests and display it in a table format.
Instead of developing the application from scratch, we will download the starter code from Angular Graph Rest Starter (Sample) app. This starter comes with code for authentication, bootstrap for responsive and angular js to control the data and html.
The below development setup requires a Node.js environment.
Prepare the Application
- Navigate the Repo https://github.com/ktskumar/angular-graph-rest-starter
- Download the source from GitHub and extract the zipped file.
- Open the extracted folder in your favorite editor. I am using Visual Studio Code editing and managing the client side source code.
- Use App Registration Portal to generate the Client Id by creating a new app.
- Navigate to public/scripts/config.json file. Then add the client Id and Redirect URI, which you have created in App Registration Portal.

- Replace the below line with graphScopes in config.json to delegate the application to access the resources.
[code lang=”js”]
graphScopes:["user.read user.read.all Directory.ReadWrite.All Directory.AccessAsUser.All"]
[/code] - Then open the command terminal and run the command “npm install”. This will download and add the dependencies under node_modules folder.
Methods to request Microsoft Graph API
- Navigate to public/scripts/graphHelper.js.
- Then add the below snippets, to fetch the all the available users and all the subscriptions for the tenant.
[code lang=”javascript”]
getallusers: function getallusers(){
return $http.get(‘https://graph.microsoft.com/beta/users’);
},
[/code]Getallusers method send the request to beta endpoint of Microsoft Graph to fetch all users information.
[code lang=”javascript”]
getlicenses: function getlicenses(){
return $http.get(‘https://graph.microsoft.com/v1.0/subscribedSkus?$select=SKUPartNumber,skuId’);
}
[/code]getlicenses method request the subscibedSKus resource and only retries the Subscription name and Id
Methods to render fetched values:
We have the methods to request the Microsoft Graph. Now we have to prepare the code for calling those methods and render the value in the html.
- Navigate to public/controllers/maincontroller.js
- Then add the below snippets,
[code lang=”javascript”]
vm.allusers;
vm.getAllUsers = function(){
GraphHelper.getallusers().then(function(response){
vm.allusers = response.data.value;
});
}
[/code]Vm.getAllUsers method calls the getallusers method from graphHelper file and store to the retrieved users array value in allusers property.
[code lang=”javascript”]
vm.licences ={};
vm.getUserswithLicenses = function(){
GraphHelper.getlicenses().then(function(response){
var licResponse = response.data.value;
for (var i = 0; i < licResponse.length; i++) {
vm.licences[licResponse[i].skuId] = licResponse[i];
}
vm.getAllUsers();
});
}[/code]
vm.getUserswithLicenses method first stores the retrieved subscription information in licenses property and within the success calls the getAllUsers method to retrieve the users. We will angular js feature to update the users’s skuid to subscription name.
- To change the header of the view, add the below line by replacing vm.view.
[code lang=”js”]vm.view = "All Users with License Status";[/code]
- We are sending the request on page load. So once we are authenticated, we have to the call the method vm.getUserswithLicenses. So within processAuth() method, add the below snippet under the line, vm.emailAddress = user.mail || user.userPrincipalName; in two places.
[code lang=”js”]vm.getUserswithLicenses();[/code]
- Navigate to public/views/main.html file and search for and replace below html snippet
[code lang=”html”]
<!–Show if there is no users available in the tenant –>
<div ng-show="main.allusers.length == 0" class="text-danger">No Users found!</div>
<!– Render the table with users and subscription names–>
<table ng-show="main.allusers.length > 0" class="table table-hover">
<thead class="thead-dark">
<tr>
<th scope="col">#</th>
<th scope="col">Display Name</th>
<th scope="col">Licences</th>
</tr>
</thead>
<tbody>
<tr ng-repeat="usr in main.allusers track by $index">
<th scope="row">{{$index+1}}</th>
<td>{{usr.displayName}}</td>
<td>
<span ng-repeat="lic in usr.assignedLicenses">
{{main.licences[lic.skuId].skuPartNumber}},
</span>
<span ng-show="usr.assignedLicenses.length == 0">
UNLICENSED
</span>
</td>
</tr>
</tbody>
</table>[/code]
- Now run the “npm start” command from the terminal.
- After successfully runs, the app asked you to login. So click Connect button on top right corner.

- In the opened popup, login with your credentials. It redirects you to the page, where you have click Accept button to delegate your permission to the app.
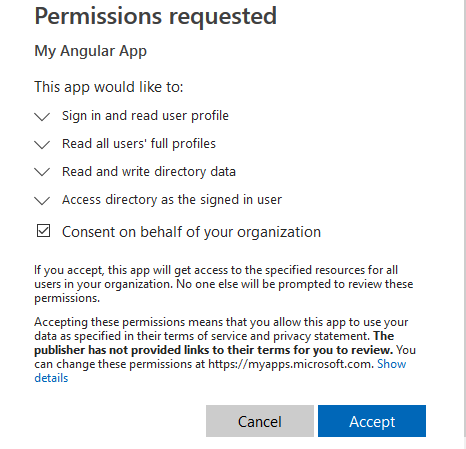
- After the approval, the output seems like below,

Cheers!


Congratulations for your Post. I saved me a lot of time!
hello,
if i wanted to show for just one (1) user in particular, may i ask how to do that? thank you!
Nice post.