Shantha Kumar T
Access SharePoint Online using Postman
This article helps on how to use Postman tool to get authenticated and access the data from SharePoint online using REST API.
Introduction
There are lot of ways to access the SharePoint API to fetch or update its resources. In all the ways, the authentication plays the important role in authorizing the access to get the information. As a developer, you may very much interested in using the PostMan tool for accessing the REST APIs.
Postman Chrome Extension
This is a developer friendly tool for handling the REST APIs from any platform. By using this tool we’ll fetch or update any information from SharePoint using REST API endpoints. We can get this utility from chrome extension and you can get that from this link PostMan Chrome Extension.
Postman & SharePoint Rest endpoints
If you are new to SharePoint REST API or you want to know more about REST endpoints in SharePoint; visit the link Get to know the SharePoint 2013 REST service.
Now we have some understanding about PostMan tool & SharePoint Rest API endpoints. Now we’ll start testing the SharePoint REST API with this tool.
Example
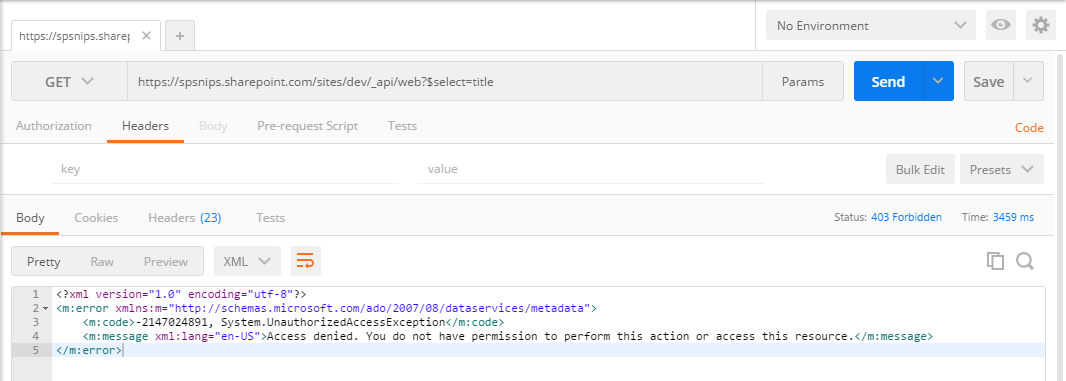
Let’s take a simple example like, getting the web title from the current site context. The equivalent syntax for retrieving the website’s title is
https://<SiteName>.sharepoint.com/_api/web?$select=Title
After entering the above URL in the text-box in the URL text-box. We will get the Unauthorized exception on accessing the information. Because SharePoint Online is very much secured and that doesn’t allow anonymous users to access the information for their site. The below is the error message response, after sending the request.
.
To avoid the Unauthorized exception, we have to add some request header values to the API request. Authentication and Authorization of SharePoint Add-Ins gives the overview of authorizing the Add-ins to access SharePoint resources by the APIs.
Authentication Policies:
SharePoint online considers any one of the below three type of polices to authenticate the Add-In.
- User Policy
- Add-In Policy – We are using this policy to authenticate the external system to access SharePoint
- User +Add-In Policy
Request Headers:
And, we require the following information in various requests to authenticate with SharePoint online site.
- Client Id
- Client Secret
- Realm (Tenant Id)
- Access Token
Authorize Postman to access SharePoint
To get authorized from external system, we should pass access-token value as a request header along with the REST API URL. Before that we have to get the access-token, for that we should generate Client Id and Secret information from the site by registering as an App only Add-In in SharePoint site. This is same as like registering add-in for Provider Hosted Add-In.
I have provided the steps below to get the Tenant Id, Access Token and data from SharePoint using PostMan utility.
Register Add-In
On initial stage, we have to register the Add-In in SharePoint, where we want to access the information. Follow the steps below to register the Add-In in SharePoint site.
- Navigate and login to SharePoint online site.
- Then navigate to the Register Add-In page by entering the url as
https://<sitename>.SharePoint.com/_layouts/15/appregnew.aspx
- On App Information section, click Generate button next to the Client Id and Client Secret textboxes to generate the respective values.
- Enter Add-In Title in Title textbox
- Enter AppDomian as a loclhost
- Enter RedirectUri as a https://localhost
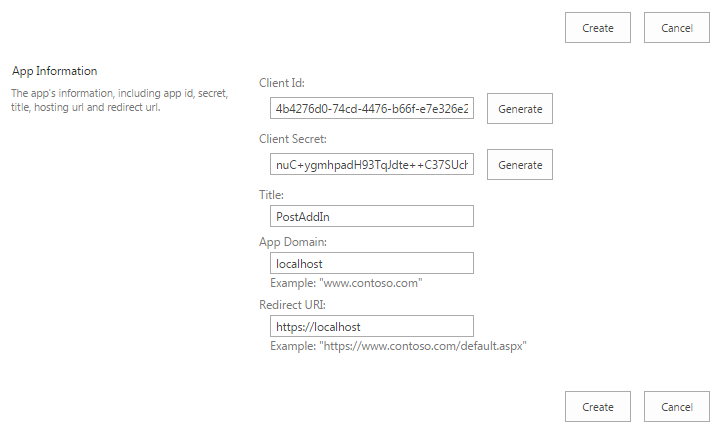
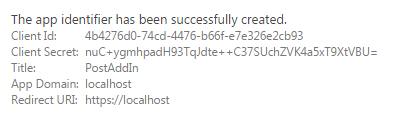
- Click Create button, which registers the add-in and returns the success message with created information.
Grant Permissions to Add-In
Once the Add-In is registered, we have to set the permissions for that add-in to access the SharePoint data. We will set the Read permission level to the web scope, so that we will be able to read the web information.
- Navigate to the SharePoint site
- Then enter the URL https://<sitename>.sharepoint.com/_layouts/15/appinv.aspx in the browser. This will redirect to Grant permission page.
- Enter the Client ID(which we have generated earlier), in AppId textbox and click Lookup button. That will populate the value to other textboxes in Title, App Domain and Redirect Url
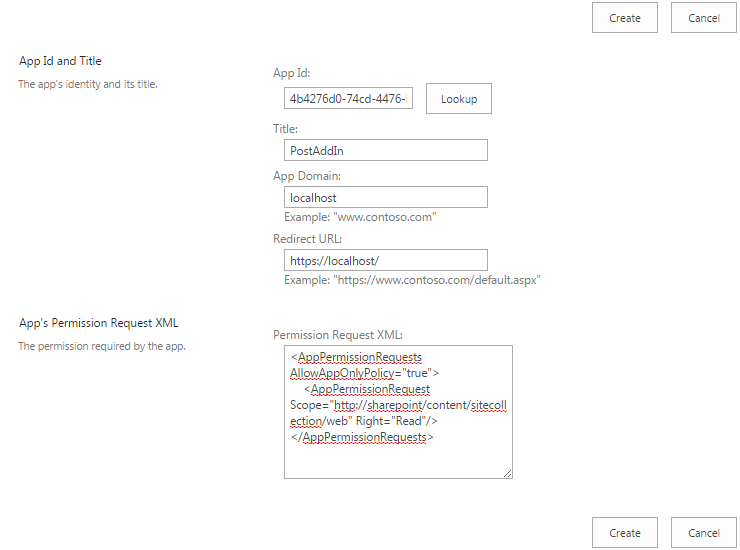
- Now enter the below permission request in XML format.
[code language=”xml”]
<AppPermissionRequests AllowAppOnlyPolicy="true">
<AppPermissionRequest Scope="http://sharepoint/content/sitecollection/web" Right="Read" />
</AppPermissionRequests>
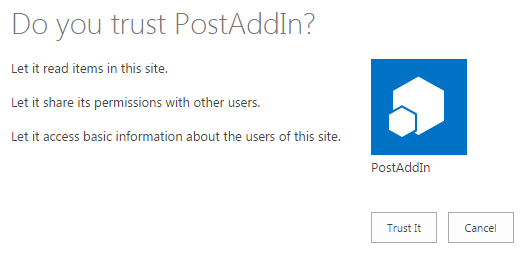
[/code] - Then click Create button. This will redirect to you page, where we have to trust the add-in to read items from website.
Note: If we want to access site collection or tenant level, we have add the xml accordingly
Retrieve the Tenant ID
Once we registered the Client Id and Secret with the permissions, we are ready to access the SharePoint information from external system or tools.
At first, we have to know the Tenant ID. Follow the below steps to obtain that information from postman. Postman helps to get the tenant Id by requesting the below url with Authorization header.
- Launch Postman chrome extension.
- Select Get Method
- Enter the below URL in the “Request URL” textbox
https://<sitename>/sharepoint.com/_vti_bin/client.svc/ - Configure the below information in the header section to send along with the url requestMethod = Get
HeadersKey Syntax Value Authorization Bearer Bearer - After applied the configuration, click Send button. The response returns lot of headers but ends with unauthorized access.
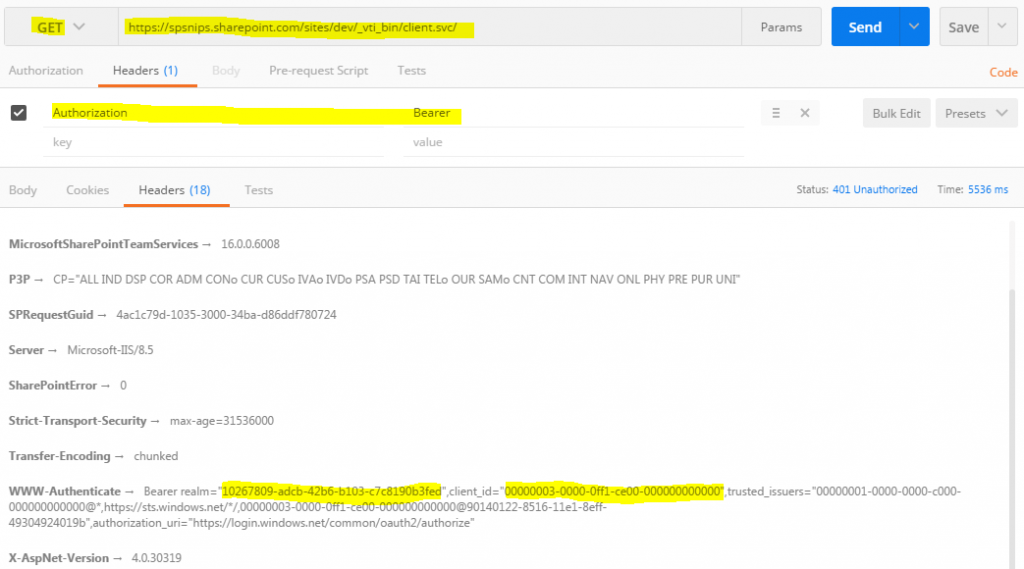
Fig 6: Get Tenant ID from SharePoint Online

Generate the Access Token
In response header, we will get WWW-Authenticate as one of the header and that contains the necessary information required for next step. The realm value contains the tenant id for the SharePoint Online site and clientid value contains the resource information (we’ll use it later).
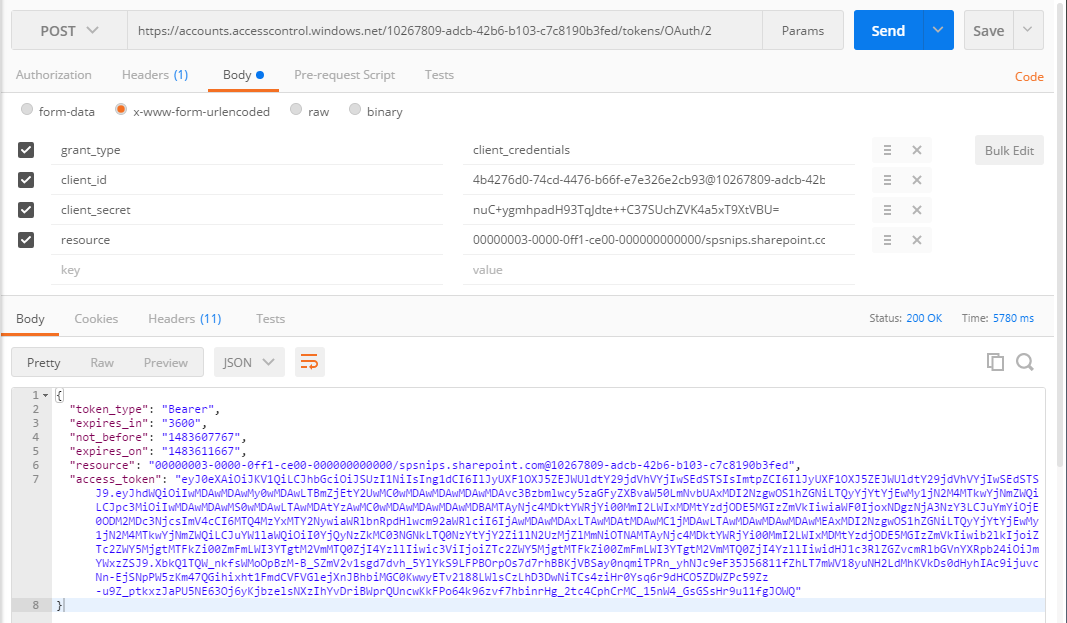
- After getting the Tenant ID, we have to form a URL with the below format
https://accounts.accesscontrol.windows.net/<TenantID>/tokens/OAuth/2 for requesting the access token. - Apply the below configurations in header
Method = POST
Headers
| Key | Syntax | Value |
|---|---|---|
| Content-Type | application/x-www-form-urlencoded | application/x-www-form-urlencoded |
Body
| Key | Syntax | Value |
|---|---|---|
| grant_type | client_credentials | client_credentials |
| client_id | ClientID@TenantID | 4b4276d0-74cd-4476-b66f-e7e326e2cb93@10267809-adcb-42b6-b103-c7c8190b3fed |
| client_secret | ClientSecret | nuC+ygmhpadH93TqJdte++C37SUchZVK4a5xT9XtVBU= |
| resource | resource/SiteDomain@TenantID | 00000003-0000-0ff1-ce00-000000000000/spsnips.sharepoint.com@10267809-adcb-42b6-b103-c7c8190b3fed |
- After applying the configuration, click Send button. That will returns the response with the Access Token.
Once we are received the access token, its like we got the authorization to access the SharePoint data based on the permission applied in Grant Permission as Add-In section.
We have to pass the access token as “token_type access_token”
Access the SharePoint resource
Now we have the access token, So we can now pass this token in Authorization header with the SharePoint REST API to get the information.
- In Postman tool, add the below URL to retrieve the web title
https://<sitename>.sharepoint.com/_api/web?$select=Title
- Apply configurations in header
- Method = POST
HeadersKey Syntax Value Accept application/json;odata=verbose application/json;odata=verbose Authorization <token_type> <access_token> Bearer eyJ0eX….JQWQ - After applying the configuration, click Send button.
- We will get the response successful as below if the permission xml applied correctly in appinv page. Otherwise we will get the access denied error message.

Conclusion
That concludes, the Postman utility helps us to test the REST API endpoint before starting the development. The same way we can retrieve or update any information from SharePoint supported by SharePoint REST API endpoints. In my next article, I’ll cover how to the same in external application using javascript.


Hi Shantha Kumar,
Nice article, provided the valuable information. Successfully created/updated the list item followed the above steps,but always it shows Created By / Modified By column value as “Sharepoint App”.
Is there any way to update the context(login) user ?
Hi Rambabu,
Will you Please guide how did a performed CRUD operation on List Item from this article.
Best Regards,
Ajay Yadav
Hi Shantha,
Is there anyway I can update/Insert items in the existing list using postman ?
Need help.
Thank and Regards,
Ajay
Hello,
Nice article, good tuto,
It was very helpful.
thank you !
Very helpful article! Thank you!
Everything worked and got the access token but finally , I try to get the title of a test site I created in sharepoint online it shows Access denied error
I ran into the same problem on a sub-site. You’ll need to register the App on any sub-site you need to make calls to.
Same for me. I also got the access denied at the end.
Hi, were you able to move ahead with this issue? I am also getting similar issue
Once you have received the access token, on the last step make sure you are passing the access token in “Header” of the get request and not in the Parameters or Body.
Hi Hitesh, were you able to move ahead with this issue? I am also getting similar issue
Hello,
Nice article! I want to use the feature to get access token by selecting the authorization method as OAuth 2.0 in Postman. Once I got the client_id and client_secret what to put in the Auth Url And Auth Token Url please help to successfully get the the access token.
Regards
hi
Did you get the solution for this ?
i am also trying to do something similar.
Great tutorial!
Very useful.
Thanks!
Hi,
Nice article. I am trying similar functionality having ADFS login to sharepoint online. I.e., using company email address (abc@company.com) to login to SharePoint online, not like abc@company.onmicrosoft.com. When I try with postman, I’m getting error “Direct login to WLID is not allowed for this federated namespace”. Is there anyway to get rid of this?
Thanks in advance
Br,
Srini K
What is the resource in the syntax resource/SiteDomain@TenantID from Generate the Access Token step?
It’s the client_id that is returned in the previous step for obtaining the tenant ID. In his example, it is 00000003-0000-0ff1-ce00-000000000000.
Please, have a look in this article and your doubt will be clear
“https://msdn.microsoft.com/en-us/library/hh629982(v=office.12).aspx”.
For all SP Online Resource value will be same.
I don’t usually comment on stuff online but this tutorial and this was really helpful! You save me a lot of time. Thank you.
Hi Shantha,
I need to perform an CRUD operation from postman?
Kindly help.
Thank and Regards,
Ajay
Really Helpful.. Thank You !.
Hi,
I followed the steps but in Generate the Access Token, I didn’t get the token. Instead I got this answer:
“Tenant not found. This may happen if there are no active subscriptions for the tenant. Check with your subscription administrator”
What Do I have to check to see if something isn’t well set up?
Thanks in advance
Hi,
I want to change the domain Name and redirect URL. That i have provided in
/_layouts/15/appregnew.aspx
How do i do it.
Can i create multiple appregnew.aspx for one site ?
I am not able to getting error.
Very Good Article.Helped me lot..Thank you sir..
Nice Article , i`m able to access the data now from external system however the access token expires after a few hours and requests stops , how can i make permanent bearer access token?!
Hi Shantha Kumar,
Would you please to share how to do simple POST method like create new folder or upload new files ?
I’m using below syntax to create new folder, and got error value cannot be null.
POST: https:///_api/web/folders
Body:
{ ‘__metadata’: { ‘type’: ‘SP.Folder’ }, ‘SPWeb.ServerRelativeUrl’: ‘/Documents/Test/’}
Headers :
[{“key”:”Accept”,”value”:”application/json;odata=verbose”,”description”:””}]
[{“key”:”Content-Type”,”value”:”application/json;odata=verbose”,”description”:””}]
[{“key”:”Authorization”,”value”:”Bearer [access token]”,”description”:””}]
I have a form in HTML and JQuery that consults a list of SharePoint Online, I am using the authentication token generated by postman to be able to authenticate and do the functions of the form, however, I have a problem: the security token expires, try to place Postman’s query on my HTML page but it throws me the following error:
Failed to load https://accounts.accesscontrol.windows.net/dc8782a5-4716-4960-975c-d0c222ae506b/tokens/OAuth/2: Response to preflight request does not pass access control check: No ‘Access-Control-Allow -Origin ‘header is present on the requested resource. Origin ‘http: // localhost: 8080’ is therefore not allowed access.
How can I generate a Token that does not expire so fast, or how can I make my HTML query the OAuth URL without throwing a Cross Domain error?
Thanks.
Awesome post! Really helped untangle SP Rest operations for me.
Thankyou Jim
Can anyone tell me How to generate Refresh token along with Access Token ?
Nice Article. Very clearly explained such a complicated stuff… Thanks a lot.
Thank you Swarup
I want to upload a file in the document folder via postman & java code also, But getting the error :
HTTP/1.1 400 Bad Request [Cache-Control: private, max-age=0, Transfer-Encoding: chunked, Content-Type: application/json;odata=verbose;charset=utf-8, Expires: Thu, 21 Oct 2021 18:00:30 GMT, Last-Modified: Fri, 05 Nov 2021 18:00:30 GMT, Vary: Origin, P3P: CP=”ALL IND DSP COR ADM CONo CUR CUSo IVAo IVDo PSA PSD TAI TELo OUR SAMo CNT COM INT NAV ONL PHY PRE PUR UNI”, X-SharePointHealthScore: 2, X-SP-SERVERSTATE: ReadOnly=0, DATASERVICEVERSION: 3.0, SPClientServiceRequestDuration: 17, X-AspNet-Version: 4.0.30319, SPRequestGuid: f33600a0-205e-c000-6f5e-35fc63b09d18, request-id: f33600a0-205e-c000-6f5e-35fc63b09d18, MS-CV: oAA2814gAMBvXjX8Y7CdGA.0, Strict-Transport-Security: max-age=31536000, X-FRAME-OPTIONS: SAMEORIGIN, Content-Security-Policy: frame-ancestors ‘self’ teams.microsoft.com *.teams.microsoft.com *.skype.com *.teams.microsoft.us local.teams.office.com *.powerapps.com *.yammer.com *.officeapps.live.com *.office.com *.stream.azure-test.net *.microsoftstream.com *.dynamics.com;, X-Powered-By: ASP.NET, MicrosoftSharePointTeamServices: 16.0.0.21820, X-Content-Type-Options: nosniff, X-MS-InvokeApp: 1; RequireReadOnly, X-Cache: CONFIG_NOCACHE, X-MSEdge-Ref: Ref A: 95828D7AF0F647DB95B57F2F9A80FEF8 Ref B: BOM01EDGE0921 Ref C: 2021-11-05T18:00:30Z, Date: Fri, 05 Nov 2021 18:00:30 GMT] org.apache.http.conn.BasicManagedEntity@62833051
Thank You Shantha, saved me so much time and effort debugging a call.
Thank you Ben
Hi , shantha , i tried above your steps, but getting Error Saying “{“error_description”:”Exception of type ‘Microsoft.IdentityModel.Tokens.AudienceUriValidationFailedException’ was thrown.”} could you help me on this. Thanks Advance
Please brief us about App domain and Redirect URI while generating client Id and secret?
Hello,
I have tried this on two different domains with the same results. What could I have setup wrong?
App Identifier:
The app identifier has been successfully created.
Client Id:
781267f0-…..
Client Secret:
jdclyCEoNws…..
Title:
FlowHTTPRead
App Domain:
localhost
Redirect URI:
https://localhost
Permissions (site collection url):
POSTMAN: GET:
https://MYDOMAIN.sharepoint.com/_vti_bin/client.svc/
[{“key”:”Authorization”,”value”:”Bearer”,”description”:””,”enabled”:true}]
Recieved:
WWW-Authenticate →Bearer realm=”46381838-…..”,client_id=”00000003-0000-0ff1-ce00-000000000000″,trusted_issuers=”00000001-0000-0000-c000-000000000000@*,https://sts.windows.net/*/,00000003-0000-0ff1-ce00-000000000000@90140122-8516-11e1-8eff-49304924019b“,authorization_uri=”https://login.windows.net/common/oauth2/authorize”
POSTMAN: POST:
https://accounts.accesscontrol.windows.net//tokens/OAuth/2
Header:
[{“key”:”Content-Type”,”value”:”application/x-www-form-urlencoded”,”description”:””,”enabled”:true}]
Body:
[{“key”:”grant_type”,”value”:”client_credentials”,”description”:””,”type”:”text”,”enabled”:true}]
[{“key”:”client_id”,”value”:”781267f0-…..@46381838-…..”,”description”:””,”type”:”text”,”enabled”:true}]
[{“key”:”client_secret”,”value”:”jdclyCEoNws…..”,”description”:””,”type”:”text”,”enabled”:true}]
[{“key”:”resource”,”value”:”00000003-0000-0ff1-ce00-000000000000/MYDOMAIN.sharepoint.com@46381838-…..”,”description”:””,”type”:”text”,”enabled”:true}]
Received:
Sorry, but we’re having trouble signing you in.
We received a bad request.
Sorry, but we’re having trouble signing you in.
We received a bad request.
Additional technical information:
Correlation ID: 062b5714-cf35-418e-ac52-8f9ef966f779
Timestamp: 2017-12-27 19:27:19Z
AADSTS90013: Invalid input received from the user.
I solved it…forgot to put the tenantid in the url:
https://accounts.accesscontrol.windows.net//tokens/OAuth/2
Thanks for the article…very helpful
Maybe, my reply would be helpful for some people since the xml which was mentioned above gave me authorization error and to overcome that issue, I needed to change that as below:
Nice article ,
helped me a lot
thanks
I am very new to sharepoint.
i have installed share point server on premise.
if i want to access the sharepoint resources over a api’s,what should i do.
Can you please enlighten.
Thanks. It was a good start working with SharePoint Online and Postman. The article is well detailed and achieved what I wanted. Thanks
Thank you SHANTHA for help the community!!
Ps: You can do the same with Flow? I Tried and get only “Unauthorized”
Great article! I’m able to get everything working for O365 just as you list.
When I try changing from /_api/web?$select=Title to /_api/SP.UserProfiles.PeopleManager/GetPropertiesFor(accountName=@v)?@v=%27i%3A0%23.f%7Cmembership%7C%40.com%27
I get an Access denied/403 Forbidden returned. Does a separate token need to be setup to use the UserProfiles api?
For some reason, my URL changed after posting. It should read
/_api/SP.UserProfiles.PeopleManager/GetPropertiesFor(accountName=@v)?@v=%27i%3A0%23.f%7Cmembership%7Cusername%40domain.com%27
Hi When i try generating access token from postman i am getting below error.
Can you please suggest what am i missing
{
“error”: “invalid_request”,
“error_description”: “AADSTS90002: Tenant 9d3b64a7-add3-49d8-a471-a3dcf51be7b2 not found. This may happen if there are no active subscriptions for the tenant. Check with your subscription administrator.\r\nTrace ID: a5cb7232-c291-4cf0-a6a7-980d6e2b2b00\r\nCorrelation ID: 93a67800-27d5-45a0-9a33-51115fd8c367\r\nTimestamp: 2018-02-19 15:06:06Z”,
“error_codes”: [
90002
],
“timestamp”: “2018-02-19 15:06:06Z”,
“trace_id”: “a5cb7232-c291-4cf0-a6a7-980d6e2b2b00”,
“correlation_id”: “93a67800-27d5-45a0-9a33-51115fd8c367”
}
Hi
Any suggestions, its bit urgent
Thanks
Hi! Did you manage to resolve this? I am having the same issue.
Thanks in advance.
Can i access subsites with the help of parents site.
I have register parent site and I am able to get list of subsite but not able to access subsite data like(list).
Can anyone please help..
Thanks in advance.
Hi,
I get an exception error at the last part when invoking the REST API. Its not very helpful, but would you have any idea?
{“error_description”:”Exception of type ‘Microsoft.IdentityModel.Tokens.AudienceUriValidationFailedException’ was thrown.”}
the ‘Content-Type’ parameter was also an issue when trying to get the token. I had to remove this before it responded with the token. kept on throwing an error otherwise that:
The request body must contain the following parameter: ‘grant_type’
any advice is much appreciated. thanks in advance.
Hi,
For the issue T”he request body must contain the following parameter: ‘grant_type’”, verify that on Body Tab, you have selected “x-www-form-urlencoded” and set the correct key for the body. I had the same issue because setting variable on Form-data choice instead of “x-www-form-urlencoded”
Hi,
when you generate the access token, verify the syntaxe of “resource/SiteDomain@TenantID”.
In my case, I did not replace the variable Sitedomain. Remplace it by “xxxx.sharepoint.com” where xxxx is the name of your tenant.
{“error_description”:”Exception of type ‘Microsoft.IdentityModel.Tokens.AudienceUriValidationFailedException’ was thrown.”}
I get the same error at the last step. Were you able to fix the issue? Please share.
@Shantha, great article, however I would request you to resolve the issue where I am stuck at the moment. It will be much appreciated.
You said you will cover how to do the same in external application using javascript. Can you plz let us know how we can find the article?
Very well written and easy to follow and 100% helpful
Hello Shantha,
Its a nice article. Could you direct me the topic/link of how to connect to sharepoint 365 and perform file and CRUD activities from and external application using javascript.
Regards
Smithesh
Thanks a lot
nice but how to get the refresh_token?????
When Granting Permissions to Add-In, irrespective of AppPermissionRequest always receive confirmation for “Let it share its permissions with other users.” & “Let it access basic information about the users of this site.”. And get no items when rest call is done to get list items _api/Web/Lists/GetByTitle()/items
Any idea?
Make sure that you really use the wording “http://sharepoint/content/sitecollection/web” within your permission request XML. (Fig.4)
Don’t replace the wording with your sitecollention and site name!
Hi Shantha,
I am trying to create records and have modified your XML to
I am sure that I’m probably missing something basic but when I follow your steps, I am able to make GET requests (read only) however, when I attempt to make a POST request, to create new List for example, using following parameters
{
“__metadata”: {“type”: “SP.List”},
“Title”: “test”
}
I get error response back
{
“error”: {
“code”: “-1, Microsoft.SharePoint.Client.InvalidClientQueryException”,
“message”: {
“lang”: “en-US”,
“value”: “The property ‘__metadata’ does not exist on type ‘SP.List’. Make sure to only use property names that are defined by the type.”
}
}
}
I tried removing ‘__metadata’ from my parameters and just parse
{
“Title”: “test”
}
in which case, I am getting following error
{
“error”: {
“code”: “-2147024891, System.UnauthorizedAccessException”,
“message”: {
“lang”: “en-US”,
“value”: “Access denied. You do not have permission to perform this action or access this resource.”
}
}
}
I would highly appreciate if you or anyone on this blog could suggest what I am doing wrong here.
Thanks in advance!
Rahul
Apologies, I seem to have missed the XML code above, its
I’m such a noob, of course I can’t just paste XML here. Basically I’m changing
Right=”Read” to Right=”Write”.
Sorry about a million posts :-)
Hi Shantha,
I am trying to get items from list but in response is only empty value.
https://mypage.sharepoint.com/apitest/_api/web/lists/getByTitle(‘.Tests’)/items
{
“odata.metadata”: “https://mypage.sharepoint.com/apitest/_api/$metadata#SP.ListData.TestsListItems”,
“value”: []
}
I granted full control for web and list, but it is still same.
Make sure that you really use the wording “http://sharepoint/content/sitecollection/web” within your permission request XML. (Fig.4)
Don’t replace the wording with your sitecollention and site name!
Hi Sushanta,
I am completely new to the SharePoint access. My requirement is is to make a call to SharePoint rest service to fetch list of items and its in cloud environment. I have followed all your steps and able to fetch access token through Postman. When I am trying to access list of items, I am unable to fetch list items it is showing below response with empty list.
2018-10-30T10:27:35Z
Its an urgent requirement. So please assist me Do I need to send any other parameters other than the accesstoken and Accept or Is there any other permissions needs to setup at SharePoint level?
Are you getting any response message?
Make sure that you really use the wording “http://sharepoint/content/sitecollection/web” within your permission request XML. (Fig.4)
Don’t replace the wording with your sitecollention and site name!
Nice article. I want to access SharePoint online list data from android mobile app. Can you help?
Super article thanks, I’ve been trying to get the final API call to work without success. Keep getting x-ms-diagnostics →3000003;reason=”Invalid audience Uri ‘00000003-0000-0ff1-ce00-000000000000/XXXXXXXXXX.sharepoint.com’.”;category=”invalid_client” no matter how I vary the possible options. I have followed the steps exactly with the exception that I want to work in a particular site collection. I get an access token without problem but always the ‘invalid audience uri’ error. I note that the @tenantID in my token request response seems to have been truncated from ‘resource’ but I have specified it in the original POST including the @tenantID.
This post is worth everyone’s attention. When can I find out more?
Gracias, me funcionó muy bien. Ahora quiero editar mis páginas de Sharepoint con alguna herramienta
Hi Shantha,
Do you have a sample about how to access sharepoint online in external application using javascript?
Thanks man! I got it to work.
Small remark, for beginners like me. When the https://.sharepoint.com/ the url of the exact site should be mentioned. So it’s more like: https://.sharepoint.com/sites//
Great tutorial, it works and it’s really well explained.
My problem is that the token seem to expire in 1 day or less cause I followed the tutorial yesterday and today I’m getting the next erro: {“error_description”:”Invalid JWT token. The token is expired.”}
What I have to do?
Thanks!
Hi,
I am new to sharepoint , i have a requirement to upload file in a specific location of organization share point URL, i am try to get access token but since it is organization sharepoint from where can i get client secret & resource to give input for below URL
https://accounts.accesscontrol.windows.net//tokens/OAuth/2
Please help
Hello, everything is going nicely here and ofcourse every one is sharing data, that’s actually fine, keep up writing.
Thanks for sharing your thoughts on Sbobet Indonesia.
Regards
In my angular Project localhost:4200 not working
set In App Details..
Client Id: 614b8bc7-***-4781-***-d3ff4f85ad0f
Client Secret: EFiShncLn0D6****e6jTo4Psak5xEAVmC**x/I=
Title: MTNHub
App Domain: localhost:4200
Redirect URI: https://localhost:4200
get Error
Access to XMLHttpRequest at ‘https://accounts.accesscontrol.windows.net/f1ad6712-ec04-4ebc-be49-c5a2f6031544/tokens/OAuth/2’ from origin ‘http://localhost:4200’ has been blocked by CORS policy: No ‘Access-Control-Allow-Origin’ header is present on the requested resource.
Hi Mayur,
I’m facing the same issue. Did you resolve it?
If yes, Can you please let me know?
How to get refresh token?
BAM! Thank you so much for this well written guide. It was a big help to me.
After I got access token, at the last step ‘Access the SharePoint resource’: I got 403Forbidden status code.
{
“error”: {
“code”: “-2147024891, System.UnauthorizedAccessException”,
“message”: {
“lang”: “en-US”,
“value”: “Access denied. You do not have permission to perform this action or access this resource.”
}
}
}
Please help. Thank you very much.
Thank you for the article…this works amazingly superb…written in 2017…still works in 2020.
resquest from PHP:
Invalid client secret is provided
I need request body like text. how I do this?
Ever so grateful
Hi Shantha kumar,
Very nice article and thanks for sharing.
By seeing this article i understood that you could help me with the issue that i’m facing in SharePoint designer web service call.
I’m trying to send request in a POST method in URL Encoded, I could not able to make using Build Dictionary action it is treating the request is in JSON format though i’m providing request header is like this application/x-www-form-urlencoded. Could you please help me here?
Thanks in advance.
Thank you Shanthakumar for the detailed blog.It really helped to fix my issue!Great !
Above XML gives me right to read sharepoint. however, it does not allow me to read Project server APIs. And i get access denied error.
Did you figure this out? I’m running into same thing, I can read sharepoint but not the project endpoints. Thanks
Hi,
I follow the steps provide by u … When I access the SharePoint online resource, I got the error message “Access Denied”. whether or not which steps I missed …
Once you have received the access token, on the last step make sure you are passing the access token in “Header” of the get request and not in the Parameters or Body.
Thanks for the great article!
But after received the access token, got following error when trying to access the rest API, please help:
{“error”:”invalid_request”,”error_description”:”Token type is not allowed.”}
This was a very helpful article, thanks for posting. I was able to make a successful access token request using Postman but when I tried the same request using my Visual Studio console app in c# was a getting a 401 unauthorized response. Turns out I had to UrlEncode the values. Apparently Postman does that by default.
Thanks much for the great article. This has everything at one place and saved me lot time. Keep writing.
Thanks for the article. This helped me alot.
Any Luck on this error so far?
{“error”:”invalid_request”,”error_description”:”Token type is not allowed.”}
Very clear article, thanks!
how to do the same in external application using javascript?
I got Token type is not allowed error when access sharepoint list!!please help me with this issue
I’ve got the same output as you. Check the discussion under this article https://learn.microsoft.com/en-us/answers/questions/714147/token-type-is-not-allowed-error-on-sharepoint-rest It works for me
Brilliant article thank you
This is just amazing! I’ve been struggling to put all the parts together to read a SharePoint list in java. THis article pulls it all together beautifully. I only needed to rewrite the Postman http requests in my java code. Awesome article.
Is that a fishing pole carrier in your cover photo? I do some backpacking and fishing here in Colorado.
Thanks it is working for me.
Good explanation. I have also written an alternate way to generate the token, please check here
https://newbietechie.com/how-to-generate-api-access-token-for-sharepoint-postman/
Good job. Thanks for sharing.
Great article, thanks a lot !
Hints for those in need to upload a file :
POST https://.sharepoint.com/sites//_api/web/GetFolderByServerRelativeUrl('/sites//Shared%20Documents//‘)/Files/add(url=”,overwrite=true)
Body:
# choose binary and select the file
Headers:
Authorization Bearer
content-length
Ref.:
https://sharepoint.stackexchange.com/questions/253430/upload-file-to-sharepoint-online-with-http-rest-calls
https://learn.microsoft.com/en-us/answers/questions/203179/getfolderbyserverrelativeurl-rest-api-return-serve
[change the values in square brackets]
Hints for those in need to upload a file :
POST https://[sitename].sharepoint.com/sites/%5Bmy_site%5D/_api/web/GetFolderByServerRelativeUrl('/sites/%5Bmy_site%5D/Shared%20Documents/%5Bmy_sub_folder%5D/‘)/Files/add(url='%5BFileFromPostMan.txt%5D‘,overwrite=true)
Body:
# choose binary and select the file [FileFromPostMan.txt]
Headers:
Authorization Bearer [accessToken]
content-length [integer length of post body]
Ref.:
https://sharepoint.stackexchange.com/questions/253430/upload-file-to-sharepoint-online-with-http-rest-calls
https://learn.microsoft.com/en-us/answers/questions/203179/getfolderbyserverrelativeurl-rest-api-return-serve